Inventory
It is important to take inventories regularly, to ensure that your Inventory Value report, COGS report, and suggested purchase are the most correct at any given time. Taking regular inventories will also help you manage portion control and identify potential theft that is happening in your business. This article will discuss the following topics:
- Inventory Types
- Taking Inventory Counts
- Editing a Completed Inventory Count & Backdating Active Counts
- Deleting Active Counts
- Spot Checking Inventory Tasks
- Creating your Spot Check Inventory Task
Inventory Types
In Avero's Food Cost Management module, there are three types of inventory you can take:
- Full Count - Full counts generate a list of every active product in your Product List. Users will count every item before completing inventory.
- Class Count - Class counts allow you to select which Product Classes you'd like to count. For example, if you want to count only Beer, Liquor and Wine, this is the task for you.
- Spot Check - Spot Checks will generate an inventory with a few select items as needed. If you need to check on a random mix of items or you want to create a task per storage area, use this count type. Spot Checks can only be created from the Place Order page.
Taking Inventory Counts
In order to successfully complete an inventory count, complete the following steps:
- Navigate to Inventory > Inventory Counts
- Click Start New Inventory Count
- Follow the steps by selecting your count type and count name
- Click Create Count
- Enter in the counts for each product (a green checkmark will confirm that your counts are saving)
- Click Complete Count when you are done counting your inventory.
Need additional help? Watch the following video for step-by-step instruction.
Editing a Completed Inventory Count & Backdating Active Counts
In order to edit a completed Inventory Count and backdate active counts,, complete the following steps:
- Navigate to Inventory Counts
- Open the count you would like to reactivate
- Click Reactivate Count, and then, Reactivate Count
- Make your edits
To backdate an inventory count, be sure to complete these additional steps:
- Select Complete Count
- Select if you want to change your count date, and click Confirm.
Need additional help? Watch the following video for instruction.
Deleting Active Counts
To delete an active inventory count, complete the following steps:
- Navigate to Inventory and then to, Inventory Counts
- Select the trash can next to the count you would like to delete
- Confirm by clicking Delete
Note: User must have the 'Inventory' special role activated to perform this function. For more information on Special Roles visit this article: Special Roles
Spot Checking Inventory Tasks
In addition to Full and Class Counts, you can create small and specific inventory tasks called Spot Checks. Spot Check inventory counts are created from the Place Order page.
This type of inventory is great if you're looking into a particular product's suggested purchase. You can quickly set up a spot check inventory for a team member to complete before placing the order for that item. You can also use the spot check inventory to create inventories by storage area or any other group of items that come from multiple product classes.
Creating your Spot Check Inventory Task
To create a Spot Check inventory task, complete the following steps:
- Click on Purchasing, and then Place Order.
- Use the report generator to filter out the product list by storage area, product class, or vendor. For help using the Report Generator, click here.
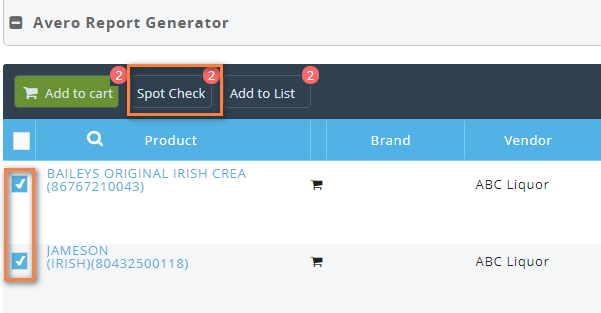
- Multi-select the items you would like to add to the Spot Check inventory by clicking the box next to them. To select all items in the list click the check box at the top left of the table.
- Click "Spot Check" button at the top of the table.
- Complete the count set up and navigate to the Inventory Counts page to begin your Spot Check.
Exporting Inventory Counts
To Export a completed Inventory Count, go to Inventory on the navigation pane to the left and select Inventory Counts. There you will see a list of Active Counts and Completed Counts. You can export Active or Completed Counts, however, the export will not indicate if the count is completed, so a best practice is to only export Completed Counts.
- Select the Completed Count you would like to export.
- On the top right of the Completed Count are search and export tools, Adobe PDF or Print.
- Select the export format desired and the download will begin automatically, or a print dialogue box will open on your computer.