Available in: All subscription levels
As an admin user, you have the ability to manage your organization's users and teams. This article will explain the statuses you will see on the user management page.
For more information about managing users and teams, go through the Admin User Training in Avero, located in the Training & Support Center access by the big question mark.
To learn how to add, edit, or delete a user visit this article: Adding and Editing Your Avero Users and Teams. If you are having trouble inviting a new user: Troubleshooting Inviting a New User
Please note: To protect your company's data Avero Support is not able to change or provision user access. This must be done within your organization.
Jump to:
- The User Management Page Diagram
- User Profile Information
- Access Levels - Assigned by admins
- User Status - Reference Information
- Managing Users' Teams
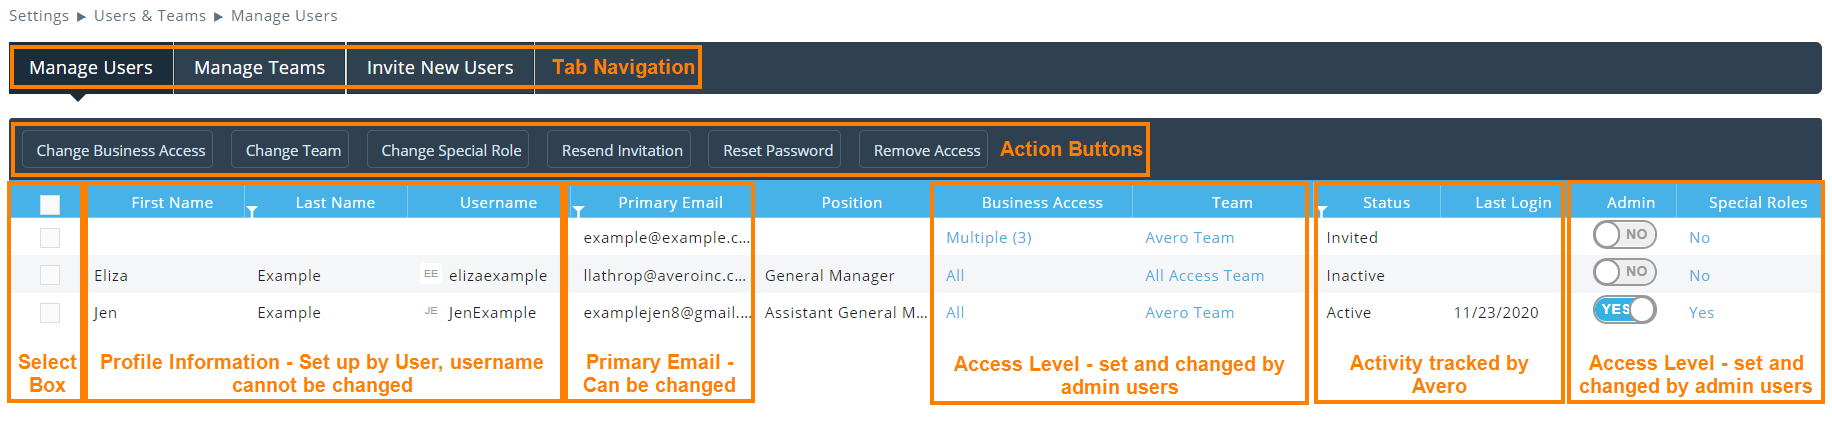
The User Management Page Diagram
Managing Users
In the Manage Users page, you will see action buttons across the top and a list of all users under businesses you have access to, with equal or lesser access (there may be additional users with access to your business that you don't see because they have a higher level of access).
You can sort and filter each column:
- To sort, click the column header to toggle between sorts
- To filter, hover over the column and click the menu button (three stacked lines) to open the filter box and make your selections
If a column has been filtered, you will see a Funnel Icon on that column header, so if you aren't seeing the user you're looking for and do see a funnel, clear the filters and look again.
User Profile Information
When accepting their invitation to Avero (sent by an admin user to invite them to access) every user sets up a user profile and makes selections on their chosen view. The user chooses a username, which will be used to sign in to Avero, and a password. Once chosen a username cannot be changed. Then they fill in their name, position and select their date and time formats and time zone, and accept the user terms and conditions.
Admin users can view, but not change, a user's name and position.
Users can edit their email, name, or position in their User Profile.
Access Levels - Assigned by admins
When an admin user is inviting a new user they are required to assign Business Access and a Team. You will see that these are blue hyperlinks, and you can click them for more information or to edit.
Business Access
The businesses to which a user has access. If a user has access to only one business, the business name will be displayed. Multiple is displayed for users with access to multiple businesses and the number of businesses in parentheses. All indicates a user has access to all of the businesses in that organization. Clicking the hyperlink opens a dialogue box to view which businesses a user has access to. If you have access to more businesses than the user, you will see unchecked boxes in this list, and checking them will grant the user access. You will not see businesses you do not have access to.
Team
Users are required to have a team assigned when sending an invitation and users can belong to only one team. You will see the name of the team displayed here as a hyperlink. Clicking this hyperlink opens a selection box to change the team if desired.
To manage the list of teams and their access levels, navigate to the Manage Teams Tab.
Admin Toggle
This toggle indicates whether or not a user is an Admin. admin have the additional rights to manage users and teams. All admins can see, edit, invite, and delete users that have equal to or lesser access than themselves. Even admin users cannot see users with access to businesses that they don't have access to.
For more information, see the following articles:
Special Roles
Special Roles are configuring permissions that you can assign to or restrict from specific users, regardless of whether they are an admin user or not. You can see a full list of Special Roles available in this article: Special Roles
You will only be able to see and assign Special Roles to which you have access - so if there is a special role you need or want and don't see it, ask your property or corporate admin to add it for you.
Why can users have Special Roles? There are some configuration roles you may wish to have users manage, but you don't wish for them to be able to invite, edit, and delete other users. For example, your company may want the IT department to handle who has access to Avero (for data security) but want to allow the F&B managers to configure the Calendar and the Logbook to their needs.
Why don't admin users automatically have all Special Roles? Much like the previous answer, sometimes you may want to let a manager be able to invite and remove people as staffing and responsibilities change, but you want to ensure every property is using the same Logbook format or Labor mapping. This allows for access to be provisioned in a way that uniquely fits your organization's needs.
User Status - Reference Information
Avero keeps helpful user information in the user management page to reference and to sort lists more conveniently. This includes a user's last login date and status. The available statuses are automatically assigned based on user activity.
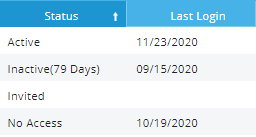
Statuses:
- Active - an active user who has recently logged into Avero
- Inactive - a user that has current access but hasn't logged in and run a report in the last 45 days. In parentheses, you'll see how many days this user has been inactive. Some users may actively be using Avero through emailed reports, but not logging in every day and so show as inactive. Only logins with report activity reflect in Status. Please note: logbook activity does not update User Status, only reporting activity does.
- Invited - indicates a user that has been invited but hasn't yet followed the link and completed their profile. This user will not be able to sign in to Avero until they follow the invitation link and set up their profile.
- No Access - indicates a user whose access has been removed / a deleted user. This user is view-only, for reference information. Admin users cannot make changes to a deleted user, and you won't see a check box next to their name. This user will need to be reinvited.
Managing Users' Teams
The team a user is assigned to will determine what they see in Avero when they log in. We recommend that everyone from the owner, down to the hostess, have some level of Avero access. Teams allow you to decide precisely which areas of Avero users on the team can access and use.
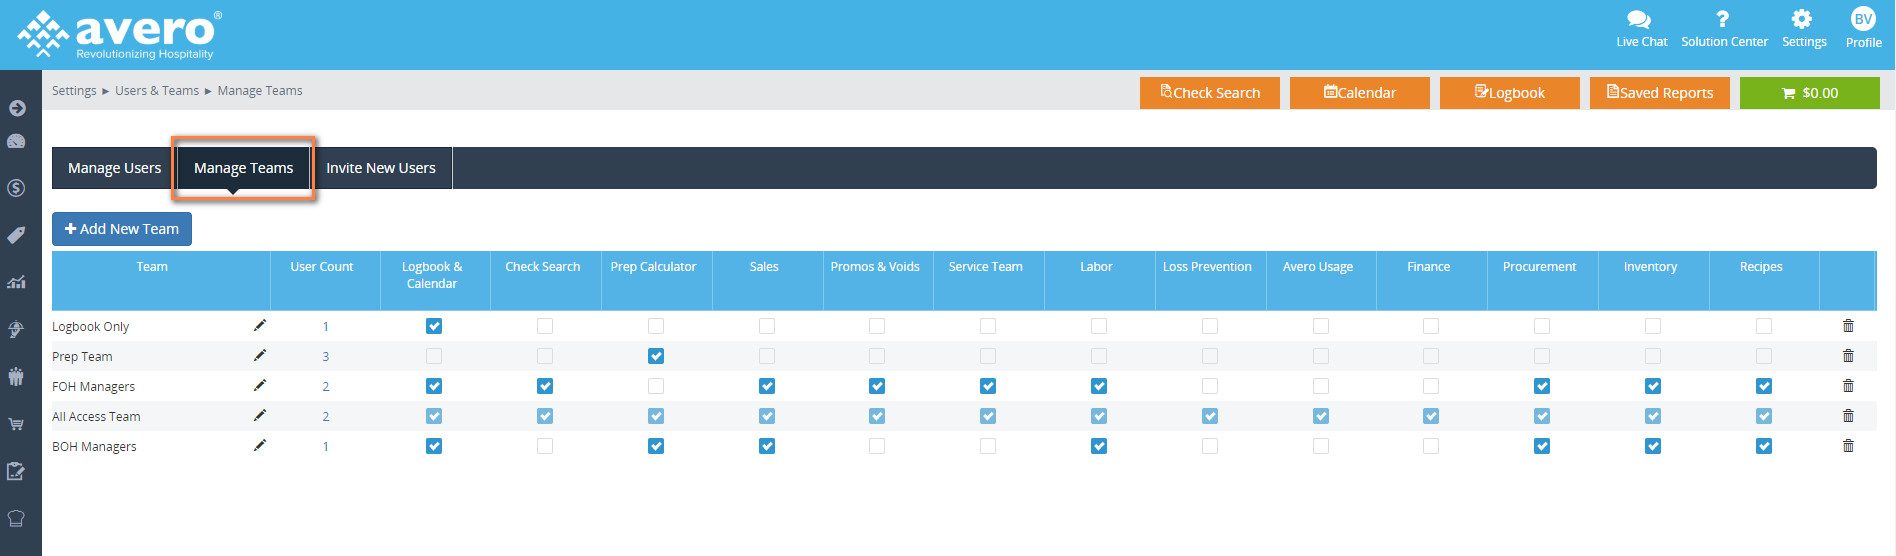
To access Teams, go to your Settings menu (gear icon in the top right) and select Users & Teams. Then click the Manage Teams tab to view and manage teams. On this page you can:
- Create new teams
- Delete old teams
- Adjust the names or access of existing teams
Remember that all users are assigned a team in order to be invited so take a look at available teams before inviting a new user to make sure you are granting the desired access!
Team Grouping Suggestions
Please Note: your subscription may not include all the listed options.
All-Access Team: This is a default team that you cannot edit or delete. Use this team for your highest level, as these users will have access to everything. Also, if you add any modules during your subscription, users on this team will gain access to the new module automatically.
Logbook Only Team - To create a logbook only team, click Add New Team and only check off the Logbook & Calendar column. This level of access is appropriate for hostesses, bartenders, closing servers, and closing kitchen staff. These users can help take notes on happenings in the restaurant like notable guest behavior, large parties, and even complete a closing or side duty checklist right from their phones.
Prep Team - Create a team for your kitchen staff. Click Add New Team and check only the column for Prep Calculator. Members of this team can sign in and see what to prep on any given day. This allows your Kitchen Manager to keep prep amounts in control while focusing on other tasks. If you have access to the FCM module, you may also want to give them access to your Recipes or Procurement functions.
FOH Manager Team – Create a team for your FOH or Floor Managers. Click Add New Team and check the columns for Logbook & Calendar, Sales, Check Search, Procurement, Inventory, Recipes, Labor, and Service as applicable.
BOH Manager Team - Create a team for BOH functions including your Chefs and Kitchen Managers. Click Add New Team and check the columns for Sales, Labor, Prep Calculator, Procurement, Inventory, and Recipes